
Guide for the setup process of the Smoothlink Procore & QuickBooks Online integration
Walkthrough Video of Integration:
https://support.smoothlink.net/walkthrough-video-qbo
Login to Smoothlink Connector:
Login URL: https://app.smoothlink.net/
Email and Password will be sent through by Smoothlink prior to the initial onboarding meeting. The integration uses a single user credential, this can be adjusted and shared as needed as discussed in the following section.
Change Password/Security Settings:
Once logged in, click your company initials at top right hand side and select Profile.
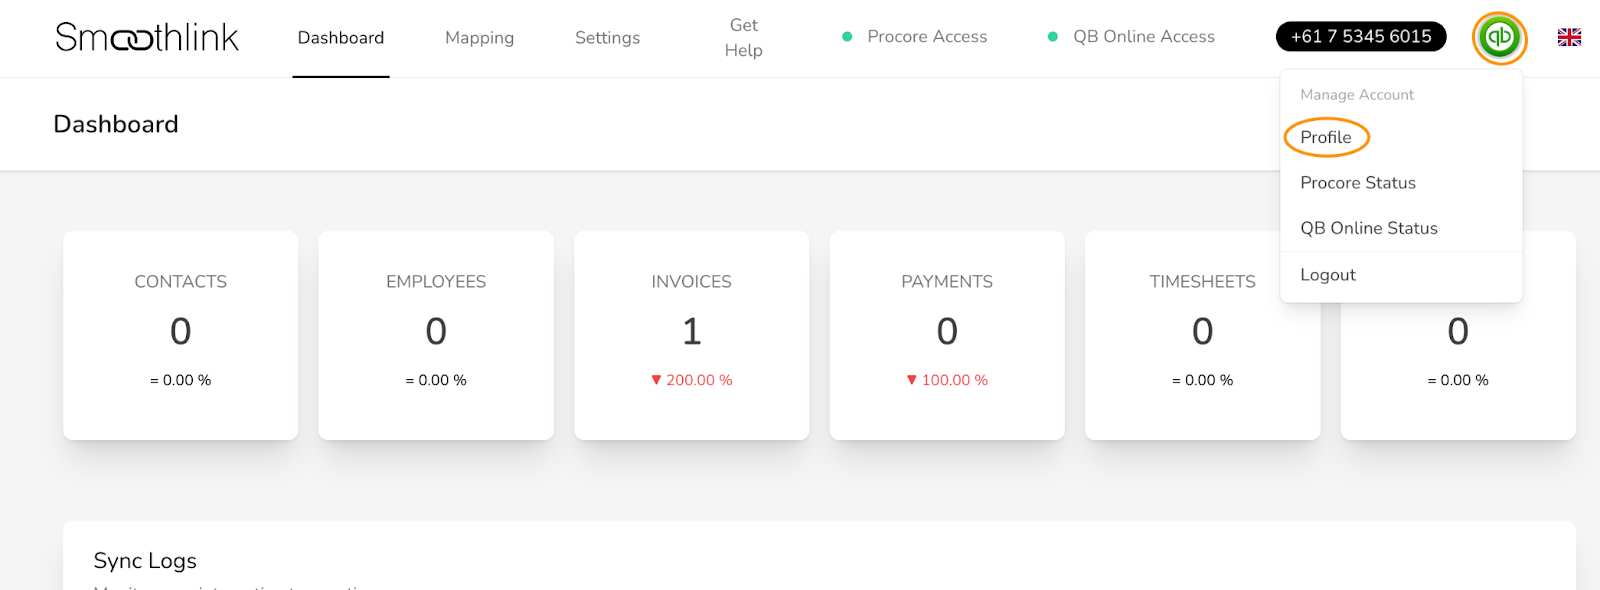
From here, you are able to change the login email if required, password and setup two factor authentication if required.

Connect Procore and QBO accounts:
First step is to Connect Procore account to Smoothlink. This will not turn the integration live, but will allow Smoothlink to pull Procore projects, vendors, cost codes, employees, tax codes and so on into the integration to begin the initial mapping process.
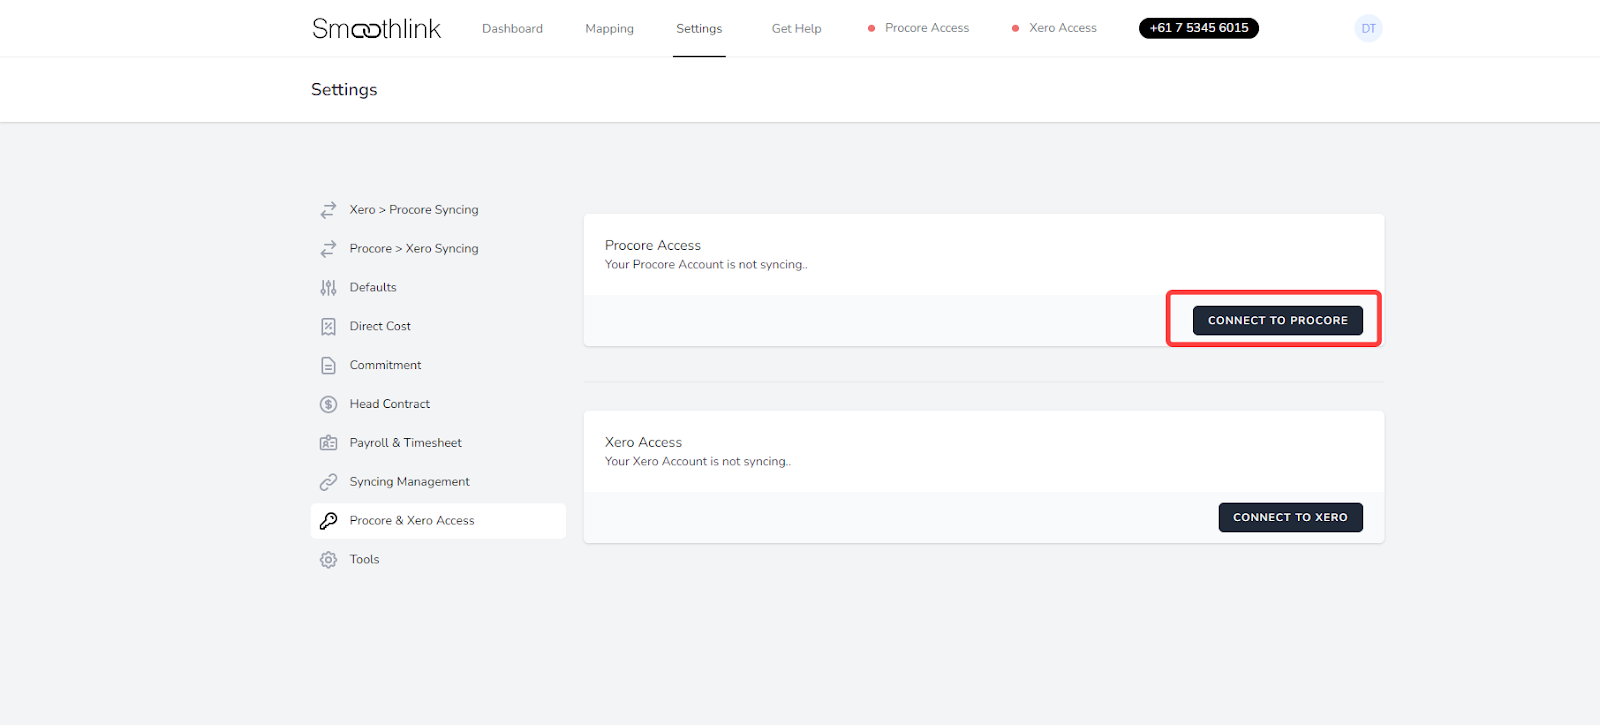
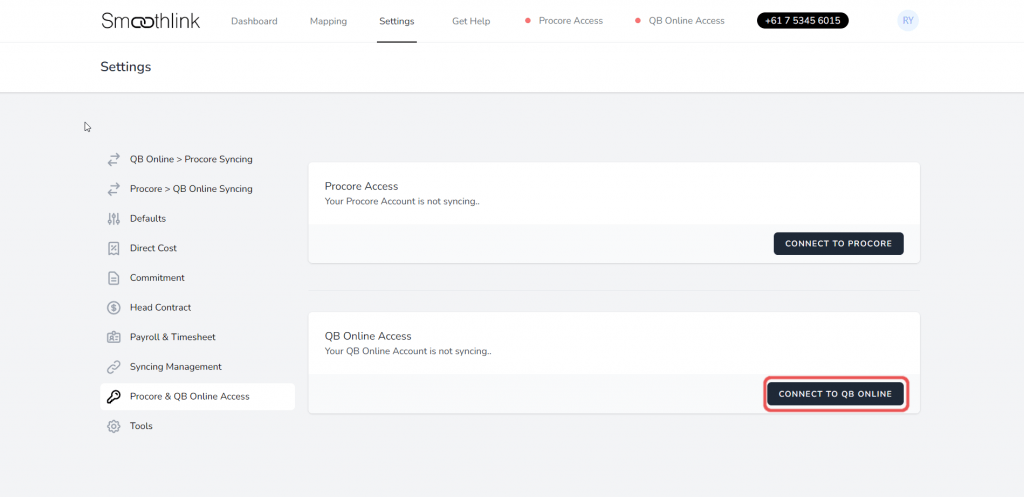
To connect your Procore account to the integration, navigate to the Settings page, then go to Procore & QB Online Access, then click Connect to Procore
After the Procore account has been connected to the integration, the next step is to make sure that the correct Procore account has been selected in the dropdown list shown in the following screenshot (this dropdown selects from the Procore accounts the user has access to):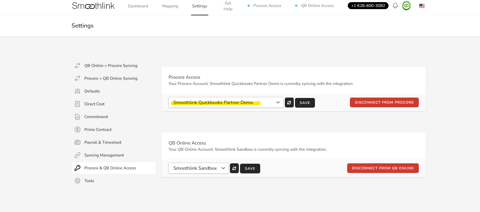
Next it is time to connect your QBO account to Smoothlink. This will not turn the integration on live, but rather allow Smoothlink to retrieve QBO projects, vendors and customers, chart of accounts, product and services, tax codes, locations and classes.
In order to connect your QuickBooks Online account to Smoothlink’s Integration go to Settings -> Procore & QB Online Access, then click Connect to QB Online (note that you must be a QuickBooks Admin on this account to authorize the software connection)
:
Mapping:
Before the integration can be switched on fully, the initial mapping must be completed.
This involves mandatory mapping of your projects, customers/vendors, and cost codes. These will be required in order for the integration to be switched on, the other mapping sections in the integration will be mapped as necessary, (for example if you wish to select tax codes on line items in Procore you can map tax codes in the Smoothlink mapping page).
Mapping Procore Companies with QBO Customers and Vendors
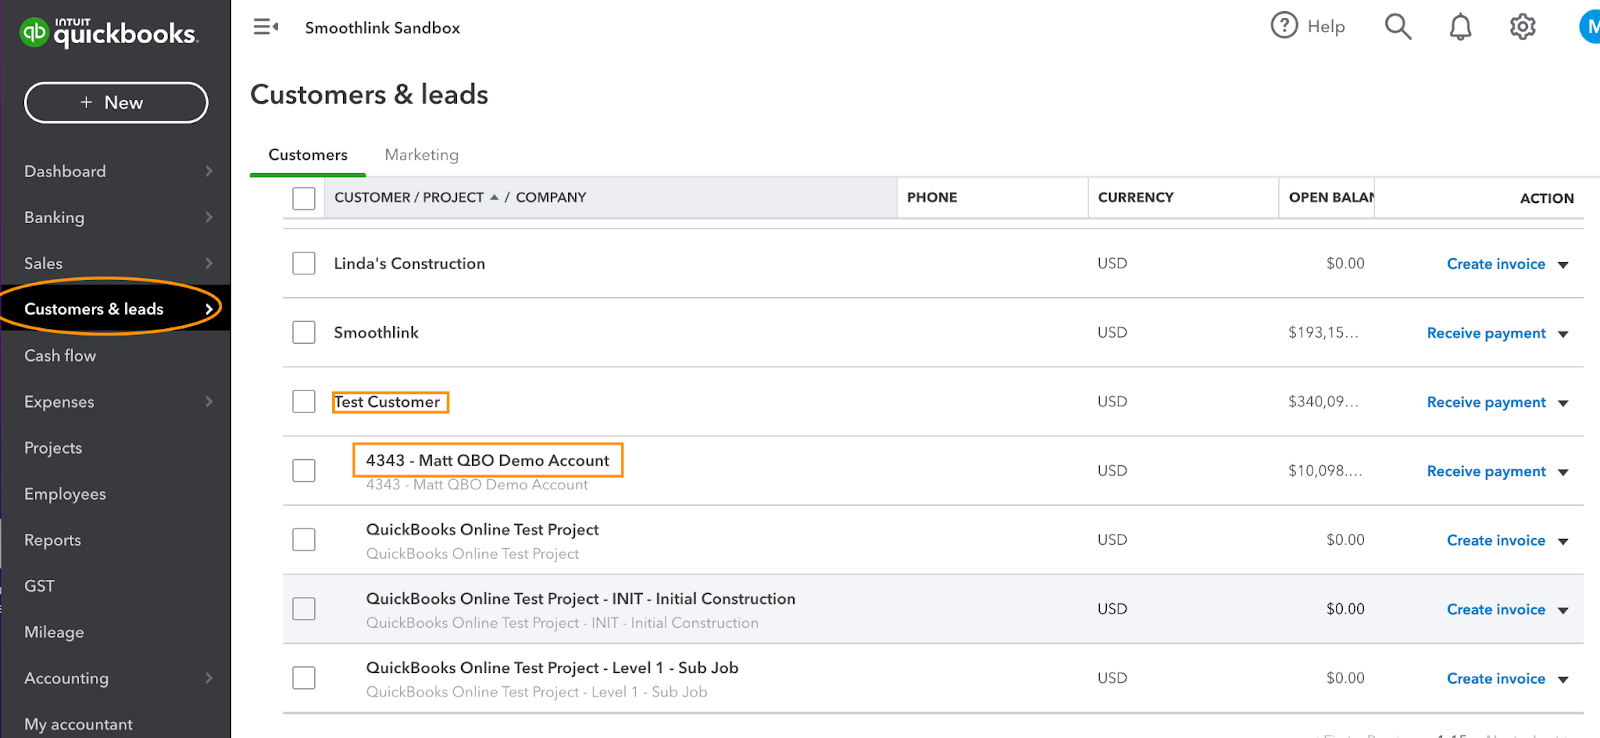
Best practice for mapping your Procore account and QBO account is to begin with mapping existing Procore Companies with QBO customers and vendors. This will mean that all your companies in Procore will have a corresponding QBO vendor/customer.
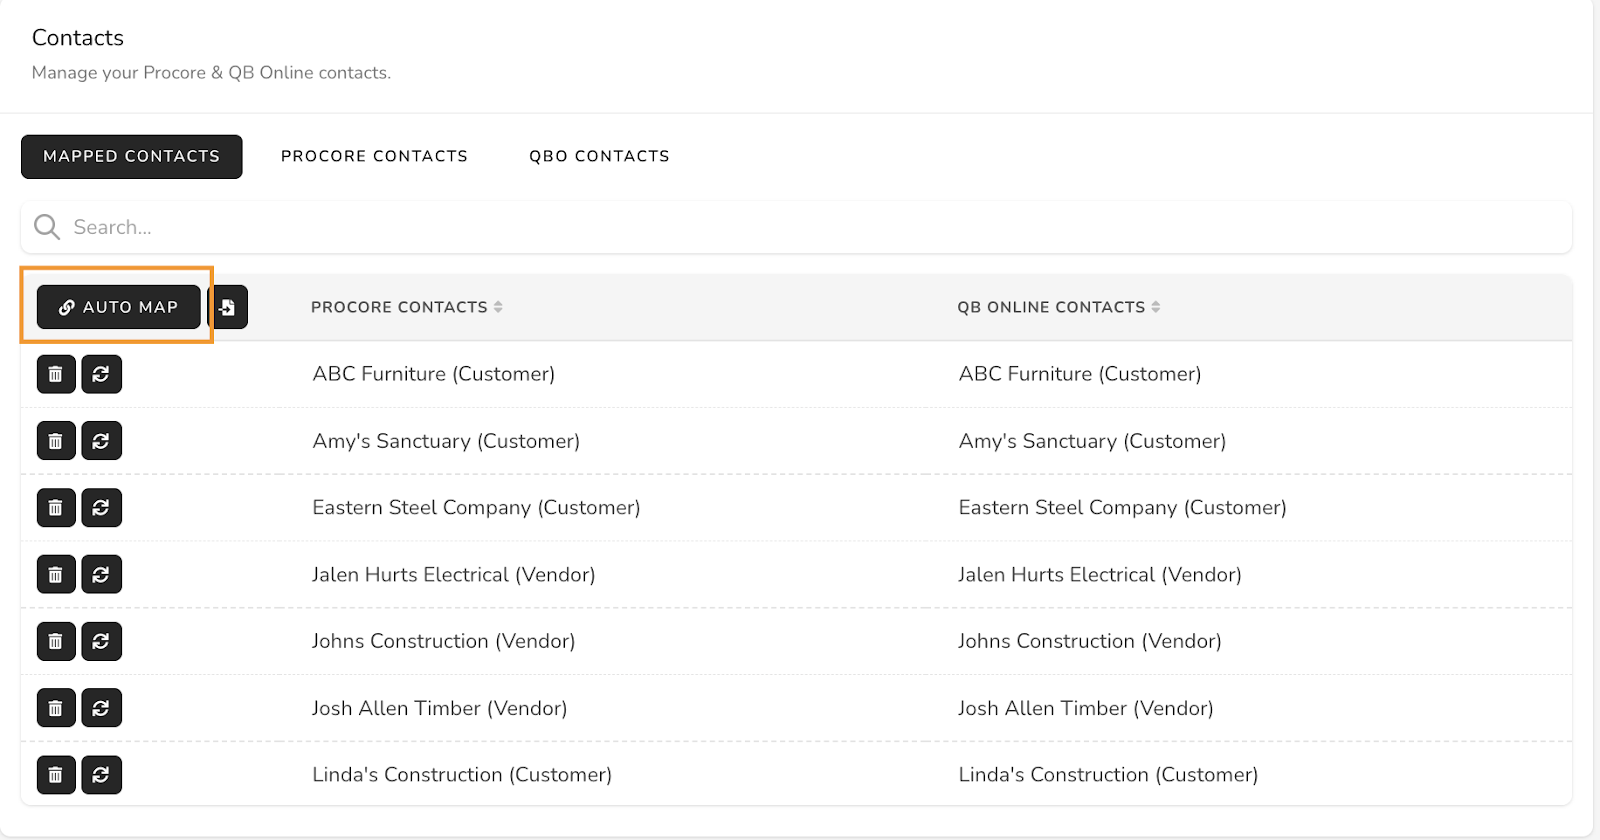
Once a vendor/customer is mapped it will move away from the 'Procore Contacts' tab or the 'QBO Contacts' tab into the 'Mapped Contacts' tab. The entries in existing in either the 'Procore Contacts' tab or 'QBO Contacts' tab are currently unmapped
There are a few options on how this mapping can occur based on your company's circumstances.
These circumstances are:
1. We are existing QBO users and brand new to Procore
2. We are existing Procore users but brand new to QBO
3. We are new to both Procore and QBO
4. We are existing users of both Procore and QBO
Circumstance 1: Existing QBO users and brand new to Procore
If you are brand new to Procore but existing QBO users then likely you will not have any existing companies in Procore and a large list of suppliers, subcontractors and customers in QBO. There are three options in this circumstance.
Option 1: A Smoothlink employee can bulk push all QBO customers/vendors into Procore. This option is good when you have recently audited your list of vendors and customers in QBO and happy for every single one to be present in Procore. These can also be removed from Procore afterwards if you're certain they will not be needed again after the customer/vendor list from QuickBooks has been pushed to Procore.Option 2: Upload the companies you want to use in Procore directly into Procore, and then use the Smoothlink automap function. This option will mean that you will only map vendors and customers that you want to exist in Procore (not every QBO vendor/customer). To upload companies in procore reference this article. Once companies are loaded in Procore, within Smoothlink in the 'mapping' page, scroll down to “contacts”. From here click on the "Procore Contacts" tab and click sync.
Click on the QBO contacts tab and also click sync. Finally click on the mapped contacts tab and select automap. This will automatically map the procore companies you have just loaded with the QBO customers/vendors.
'Automap' will check to see names that look to be the same in both systems and map them automatically. There is some leniency however (such as ignoring 'LLC') so make sure to double check the list after it maps these for you.
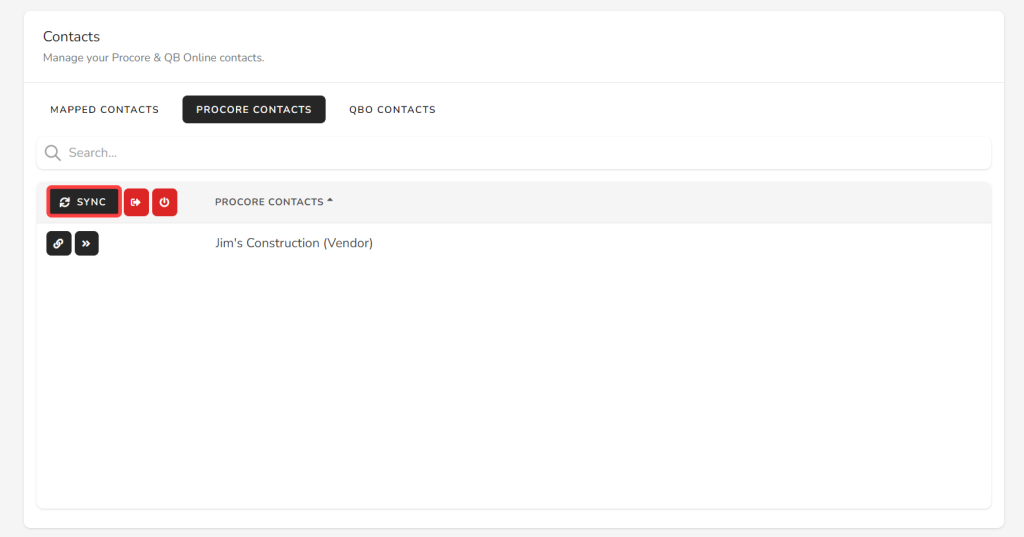
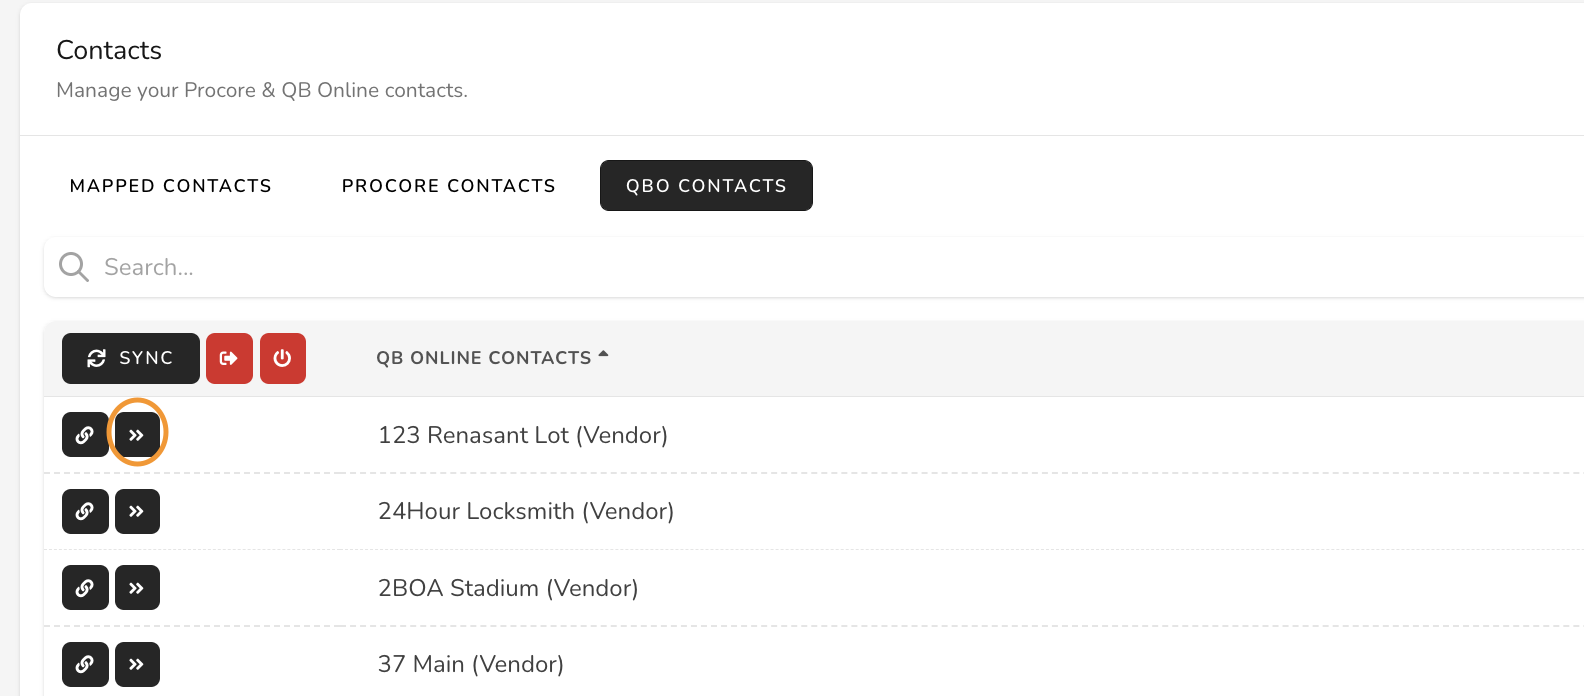
Option 3: Via the Smoothlink interface you are able to push individual QBO vendors or customers into the Procore directory as new companies. This will also map it within the Smoothlink Contacts section.
This option is good if there is a small number of vendors/customers that exist in QBO that you want to push to Procore. To do this click on QBO contacts and select sync to bring your existing customers/vendors from QuickBooks into the section.
Next to each customer/vendor there will be an icon that looks like ">>". If you click this next to a vendor/customer, the integration will create the vendor/customer in Procore with the information from QuickBooks and map it for you.
Circumstance 2: Existing Procore users and new to QBO
If you are brand new to QBO but existing Procore users then likely you will not have any existing vendors/customers in QBO and a large list of suppliers, subcontractors and customers in Procore. There are three options in this circumstance.
Option 1: A Smoothlink employee can sync all Procore companies to QuickBooks as vendors. The ones that are customers can be adjusted on the QuickBooks end and then mapped in the contacts section.
Option 2: Upload/create the vendors and customers you want directly into QBO, and then use the Smoothlink automap function. Once vendors/customers are loaded in QBO, within Smoothlink under mapping, scroll down to “contacts”. From here click on the Procore contacts tab and click sync.
Click on the QBO contacts tab and also click sync. Finally click on the mapped contacts tab and select 'Automap'. This will automatically map the QBO customers and vendors you have just loaded into QuickBooks with your existing Procore company directory.
'Automap' will check to see names that look to be the same in both systems and map them automatically. There is some leniency however (such as ignoring 'LLC') so make sure to double check the list after it maps these for you.
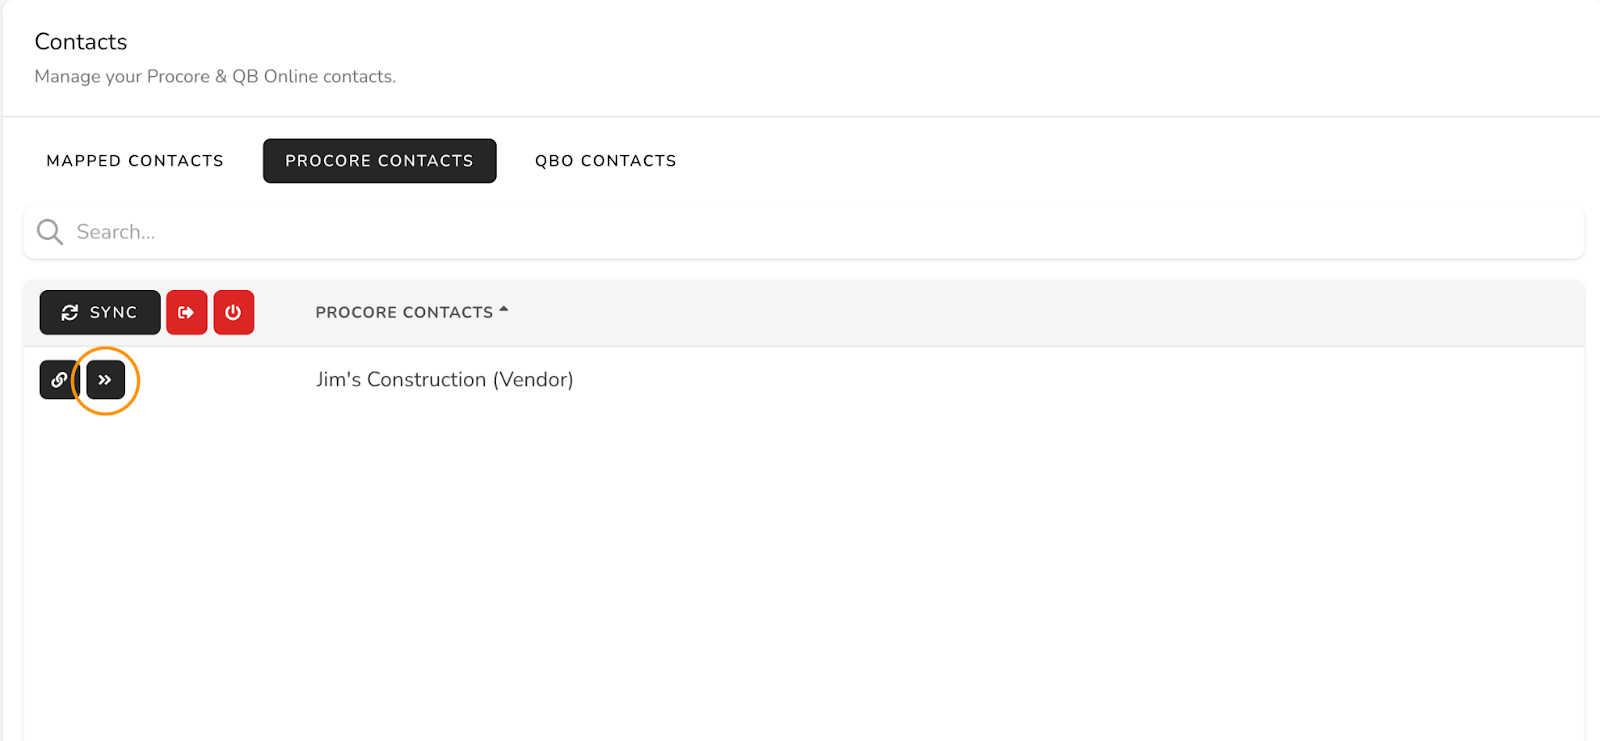
Option 3: Via the Smoothlink interface you are able to push individual Procore companies into QuickBooks Online. This option is good if there is a small number of vendors/customers that exist in Procore that you want to push to QBO. To do this click on Procore contacts and select sync. Next to each customer/vendor there will be a ">>" icon. If you click this next to the Procore company, Smoothlink will send this through to QBO and map it for you.
Circumstance 3: Brand new Procore users and brand new to QBO
If you are brand new to QBO and Procore then likely you will not have any existing vendors/customers in either system. Typically there is two approaches:
Option 1: Upload vendors/customers in either Procore or QBO, and then request a Smoothlink employee to push all vendors/customer to the other systemOption 2: Upload vendors/customer in both systems, then sync them into the Smoothlink 'Contacts' section by going to the 'Procore Contacts' tab and clicking 'sync' then going to the 'QBO Contacts' tab and clicking 'sync'.
After doing this, go to the 'Mapped Contacts' tab and select 'automap'.
'Automap' will check to see names that look to be the same in both systems and map them automatically. There is some leniency however (such as ignoring 'LLC') so make sure to double check the list after it maps these for you.
Circumstance 4: Existing Procore and QBO User
In the case that you are an existing user of both systems, what you will need to do is use the mapping tool to associate your existing Procore directory to your customer/vendor list in QuickBooks. To do this, firstly, sync in the Procore companies in the 'Procore Companies' tab. Then sync the QBO companies in from the 'QBO Companies' tab. Then, you can go to the 'mapped contacts' tab and press the 'automap' button.
'Automap' will check to see names that look to be the same in both systems and map them automatically. There is some leniency however (such as ignoring 'LLC') so make sure to double check the list after it maps these for you.
After this, there will likely be some leftover entries in both the 'Procore Companies' tab and the 'QBO Companies' tab. These can then be linked individually in either the 'Procore Companies' tab or the 'QBO Companies' tab by clicking the chain button and selecting the corresponding company in the other system using the dropdown menu.
Mapping Procore Projects with QBO Sub customers/Projects - Setup
Once the customers/vendors have been mapped into both systems, the next step is to map Procore Projects with QuickBooks. When the integration is live, how it will work is any new Procore Project created will create a subcustomer in QBO with the Project's name from Procore.
Due to the way the system works, it will create a 'subcustomer' in QuickBooks rather than a 'project'. To convert it into a QuickBooks project follow this guide:
https://support.smoothlink.net/subcustomer-conversion-into-projects-guide
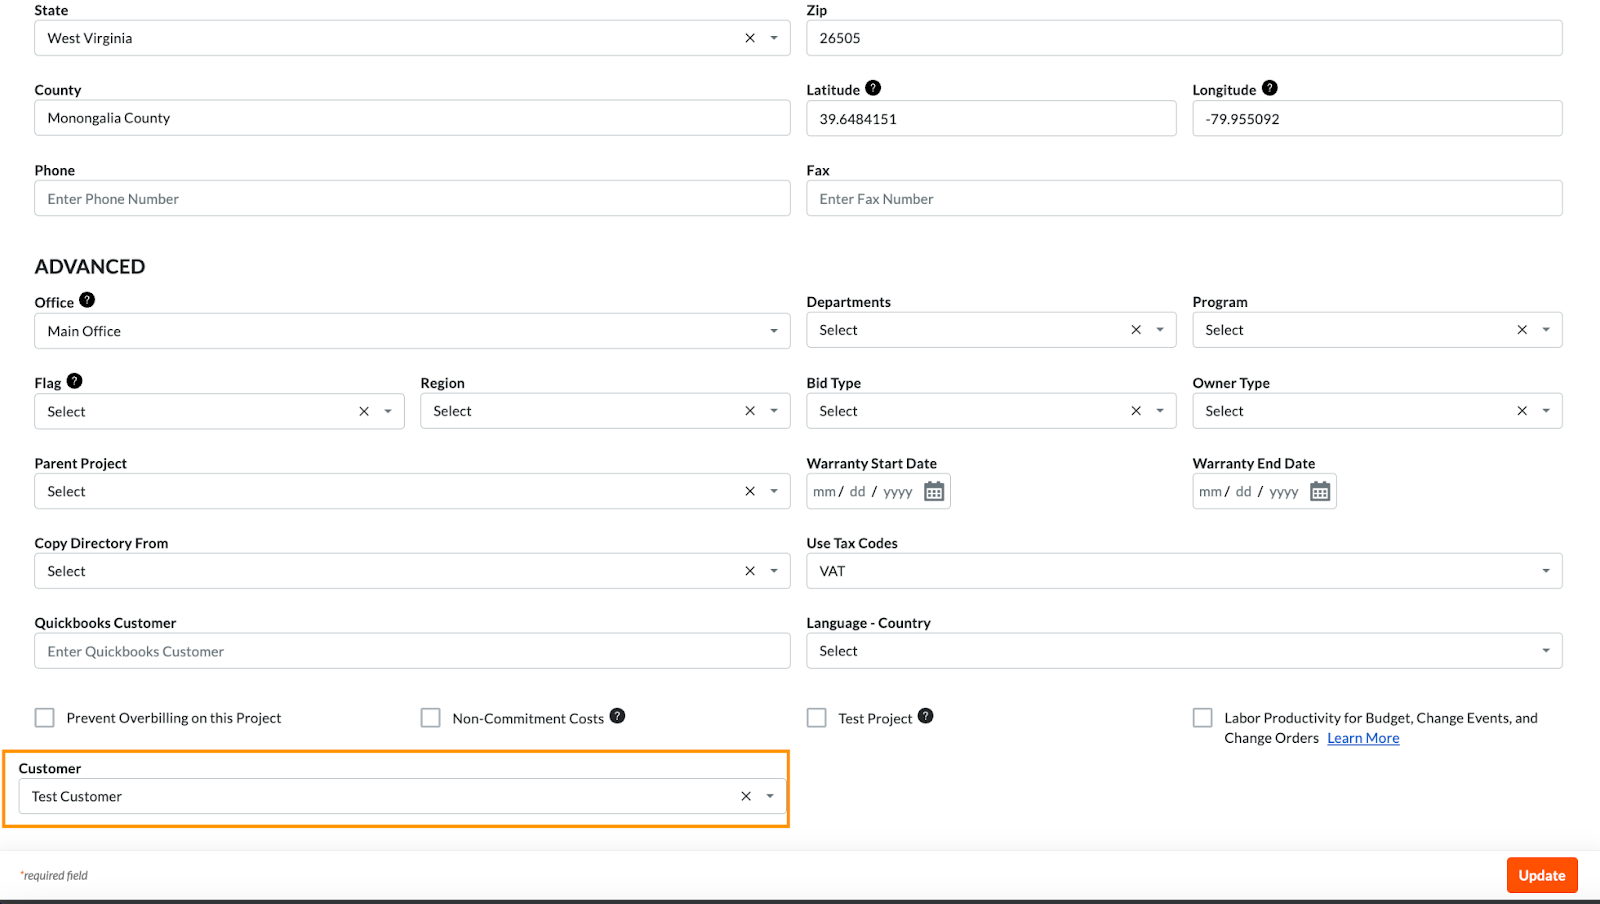
In order for Smoothlink to create a sub customer in QBO when a new Procore project is created, you must select the 'Customer' in QuickBooks it will be sent to when it syncs. To do this, there will need to be a field set up for the project's admin tool in order to select the customer for each Procore project.
Create Custom field for Customer in Procore:
Creating the “customer” custom field in Procore will allow the syncing of projects from Procore to QBO. This Video shows how to do this.
The process is:
- Go to company wide admin tool in Procore
- Go to Project Settings on the right hand side and click -> Fieldset
- Edit fieldset (if there is no Fieldset click to create one and name it)
- Scroll to bottom, click add custom field
- Add new custom field with field name “Customer” and field type “Company”
- If you wish to have this on all projects in Procore, click ‘required’
- Click Save
How to use Smoothlink to automatically create a new subcustomer in QuickBooks for the Procore project
Once this custom field is created, every time you create a project in Procore that needs to be synced to QBO, you will need to have a QBO customer selected in this field. To do this:
- Go to project level admin tool for the desired project
- Scroll down to the bottom, select the customer on the dropdown that has been synced across from QBO -> Procore
- Click update
This will then create a new sub customer in QuickBooks online using the mapped parent customer you selected in the 'Customer' tab on the project.
In the case that the Procore company selected is mapped to a vendor in QuickBooks the project will not automatically sync. Make sure the selected company in Procore is linked to a 'Customer' in QuickBooks when looking at the Smoothlink contacts mapping table
Mapping QBO Projects that existed before Smoothlink was brought in
If you are already using QuickBooks, you may have existing projects/subcustomers. These may also be active projects that are existing in Procore also. In this case we can link the Procore project to the already existing QuickBooks project.
In order to pull the existing QBO projects you have already created, go into the mapping tab and under projects select QBO projects and click sync:
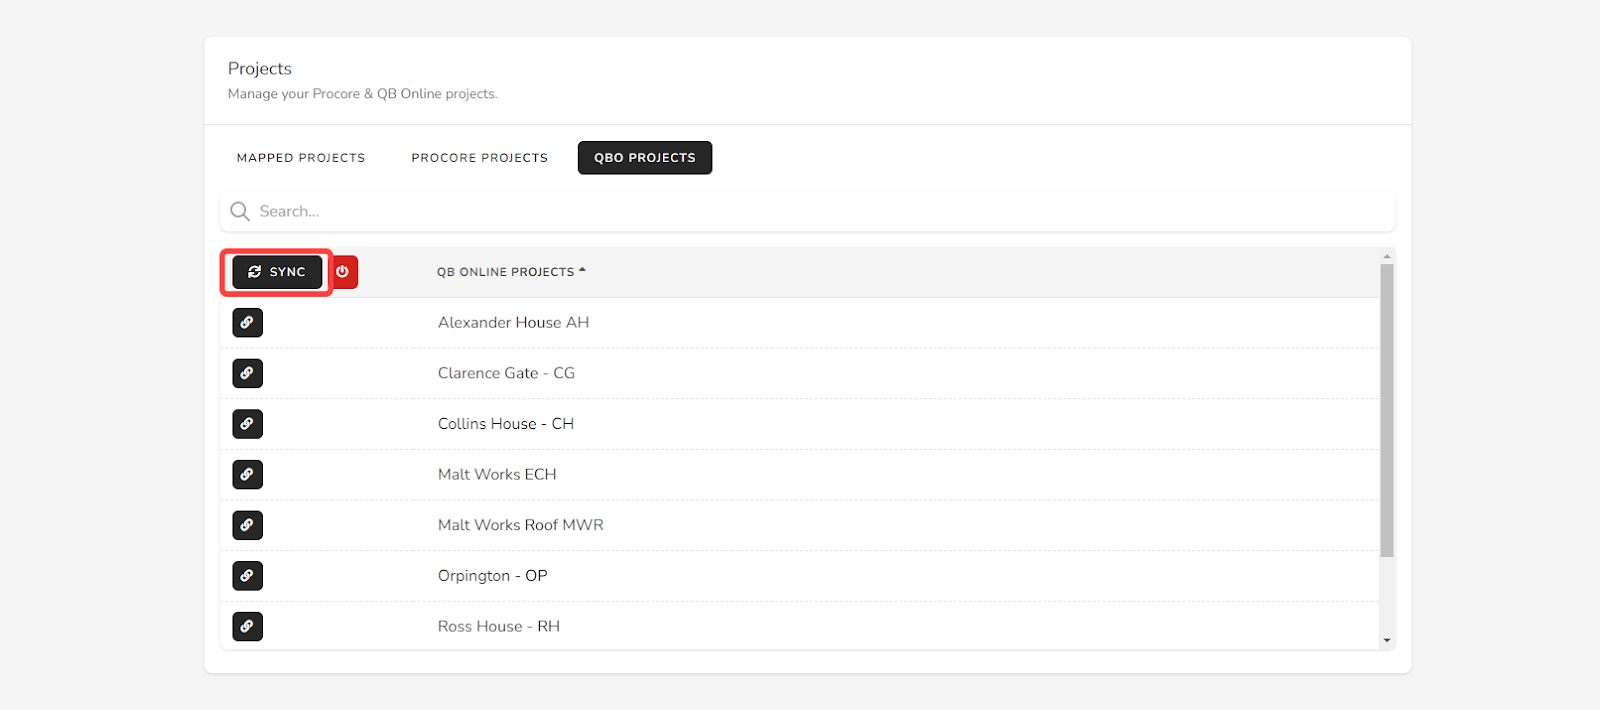
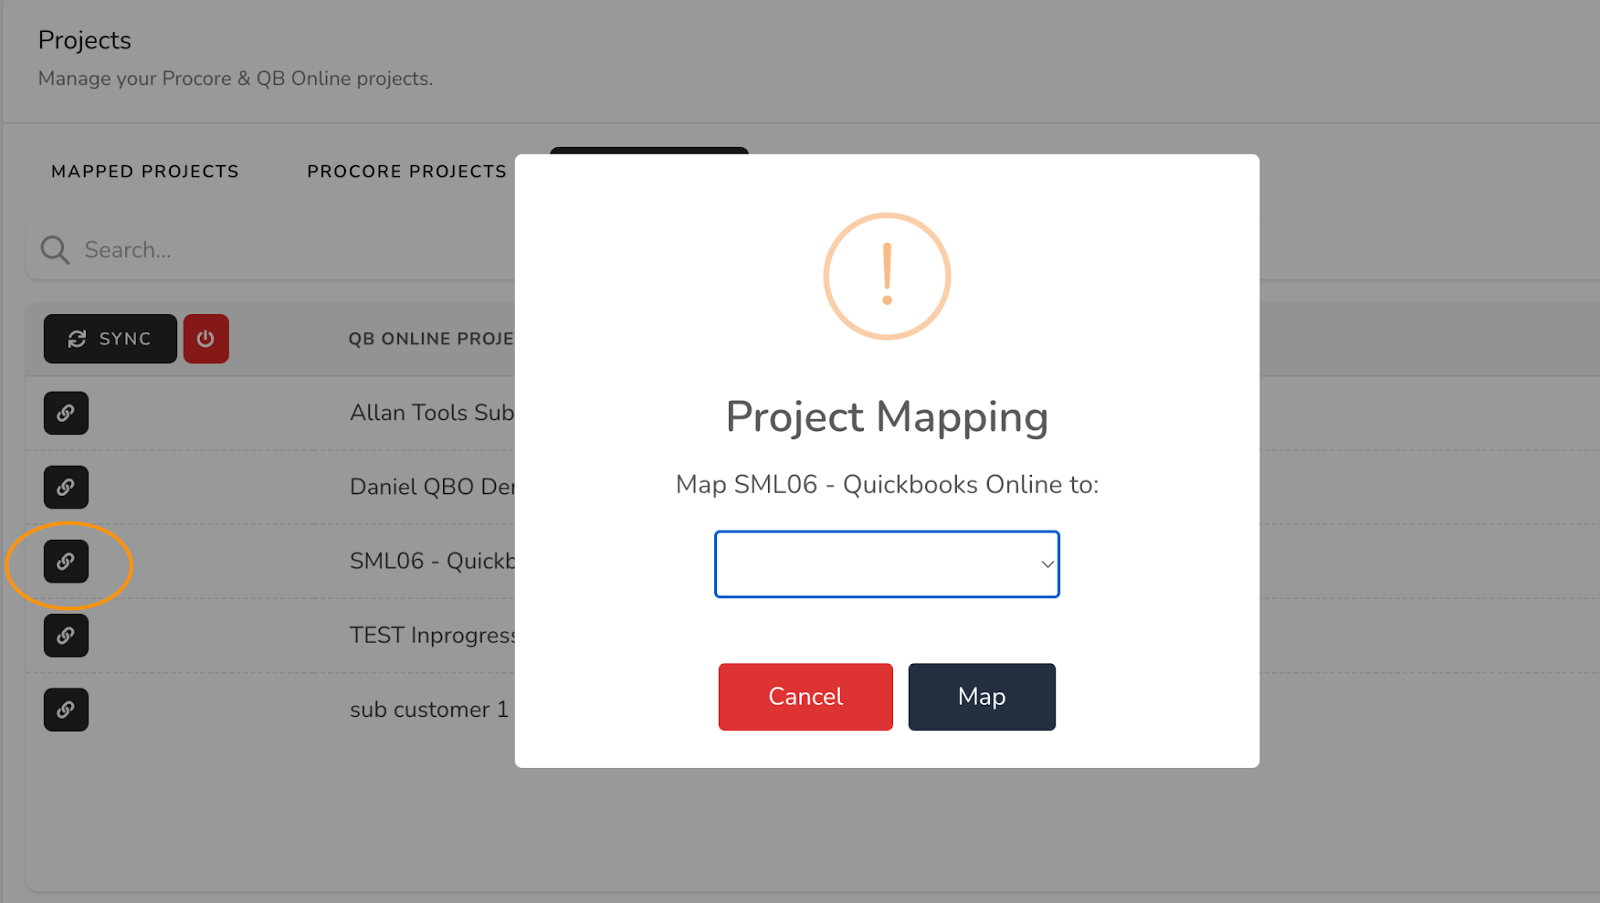
From here, if you want to connect an existing QBO project with an existing Procore Project, click on the chain link next to the QBO project. A pop up will then appear where you can select the Procore Project you want to associate the Existing QBO project with. Once this is done, it will move to the mapped tab, and the syncing will occur between the existing QuickBooks project you selected and the Procore project selected in the dropdown menu.
Mapping Procore Cost Codes with QBO
Once Customer/vendor mapping and project mapping have been completed, the third primary mapping item is Procore cost codes.
There are a few different ways that Smoothlink can map your Procore cost codes to QuickBooks Online.
OPTION 1: Map Procore Cost Codes to your Chart of Accounts (categories)
With this option Smoothlink will map your Procore cost codes solely to your QBO chart of accounts.
This will likely mean there is a many to one mapping, where you will have a detailed procore cost code structure which is then grouped and push to a selection of accounts in your chart of accounts.
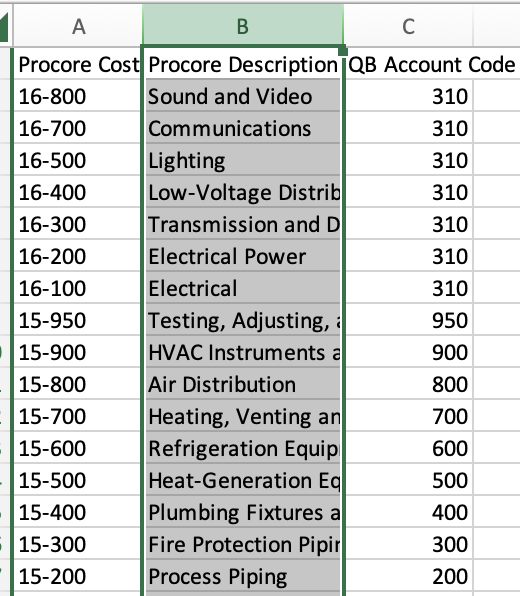
For exampe, below you will see several different Procore Cost codes being linked to one account in the chart of accounts 'Purchases'.
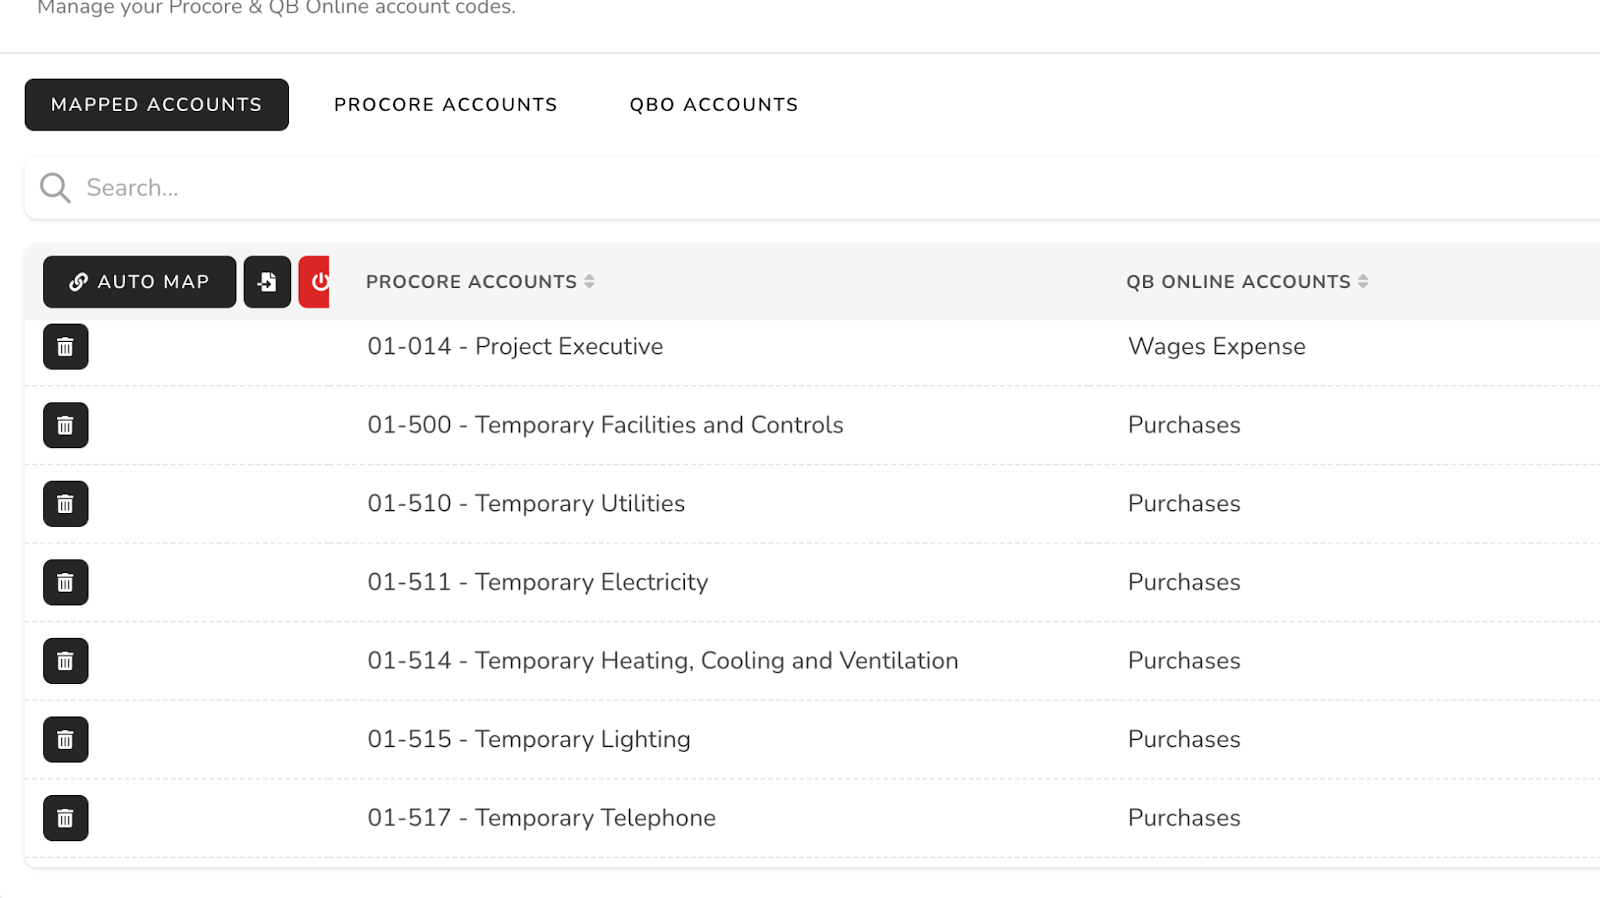
The benefit of this approach is it keeps QBO simple, you will not have hundreds of codes in QBO.
The implications of this approach is for the most part all cost information MUST start in Procore and Push to QBO. As we are associating many Procore cost codes to one QBO chart of account, if a cost starts in QBO we will not no how to push it to Procore to the right, as there could be hundreds of codes allocated to the chart of the account.
For this approach you can map it two different ways:
1: Via the smoothlink interface
Under the mapping tab scroll to account codes. Click on QBO Account and click sync. Then Click on Procore accounts and Click sync.
Then for each Procore cost code, select the chain icon. A pop-up will appear where you can then choose the QBO chart of account you want the Procore cost code to sync too.
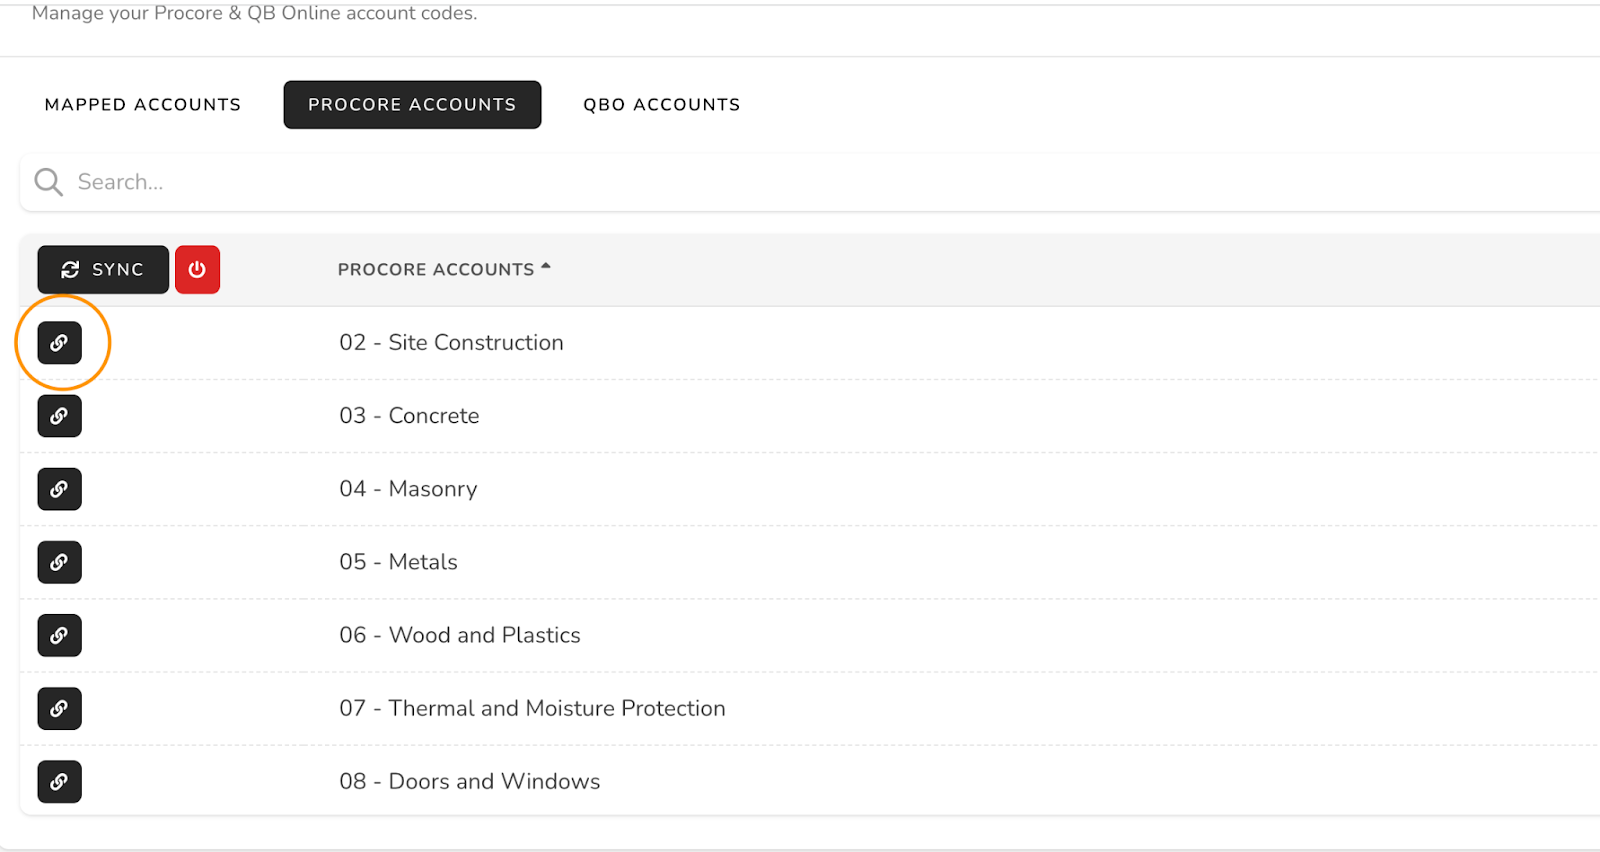
NOTE: once a Procore Cost Code is mapped it will move from the procore tab and only exist in the mapped contact tab. In order for the Integration to function, there should be NO procore cost cost in the Procore Account Tab once you have finished mapping
2: Via CSV import
The second approach to map procore cost codes to QBO chart of account is via a CSV import.
To do this firstly export your Procore cost codes directly from Procore. Reference this video on how to do that Video
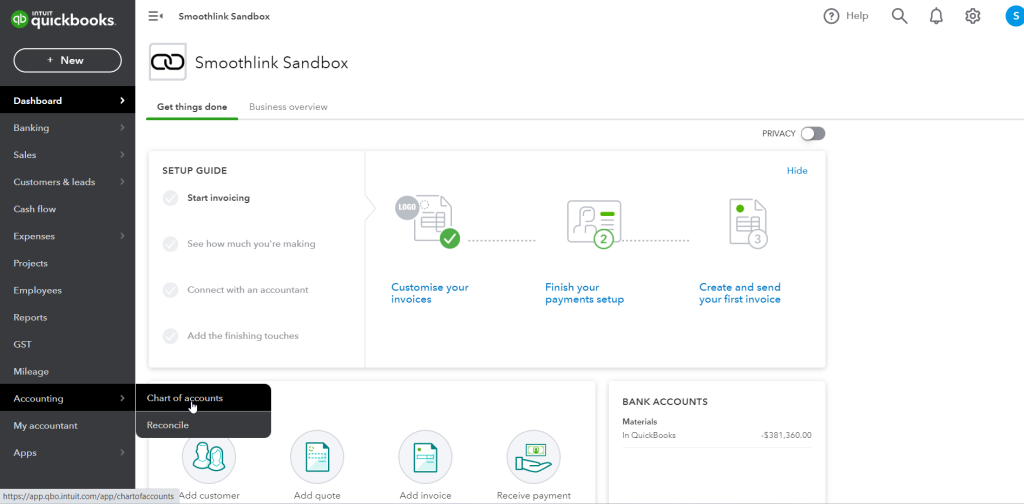
Secondly export you QBO Chart of accounts;
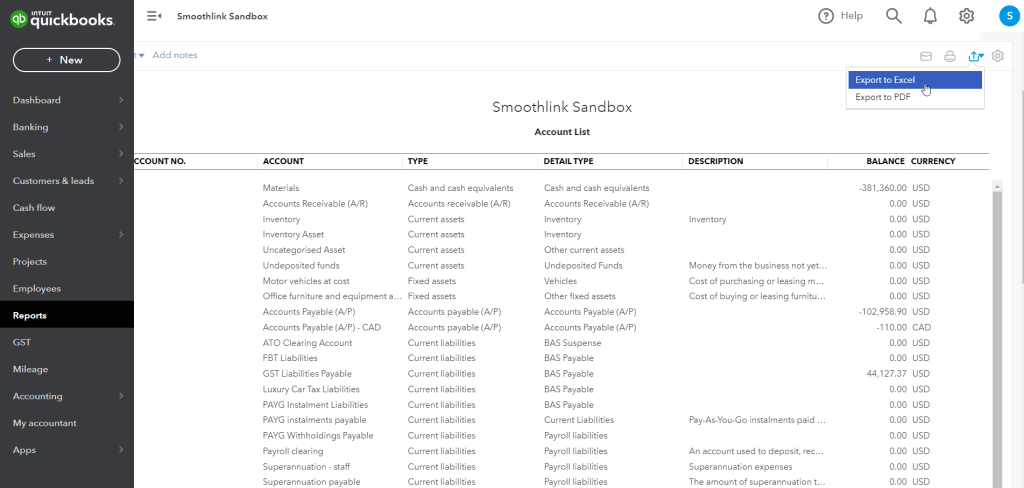
To export the your chart of accounts for QuickBooks Online as an excel spreadsheet, go to accounting -> chart of accounts:
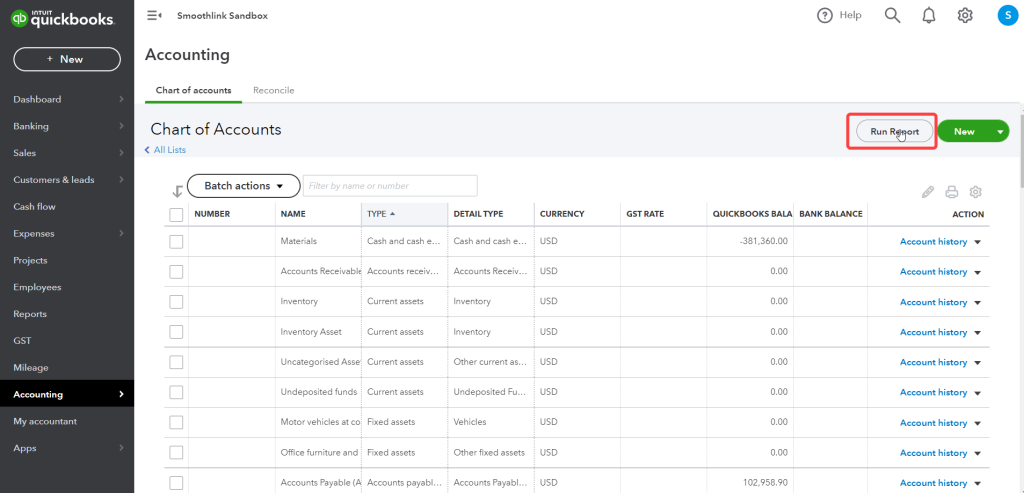
Then, in the Chart of Accounts page click to run report:
Then, in the reports page, click to export to excel:
Now that you have both Procore cost codes and qbo chart of account, in a spreadsheet create three columns. The column on the left input all your procore cost codes. The middle column input procore cost code name. The column on the right input the QBO chart of account code/name that you want to allocate each Cost code to.
Send this excel spreadsheet to a Smoothlink employee who can review and then import this for you
OPTION 2: Map Procore Cost Codes to QBO Product and Services
QBO offers a product and services section which you can allocate all QBO costs and invoices too. The reason why this would be utilised is if you wanted to have a one to one mapping where you have the exact same Cost codes in both systems.
The benefit of this approach is two fold. 1. information can start in Procore or QBO and pushed to the other system, thus a full integration is possible. 2. You are able to have granular reporting in both systems.
The reason why we connect to Product and services is because there is an unlimited amount. Whereas the QBO chart of accounts is max of 300 (depending on subscription). As such all bills/expenses/invoices will be coded against the Product and Service, and then in QBO you would map each produce and service to a chart of account for your general accounting purposes.
A Smoothlink employee can instantly push all your Procore cost codes to QBO products and services and map them, so this would be a simple implementation.
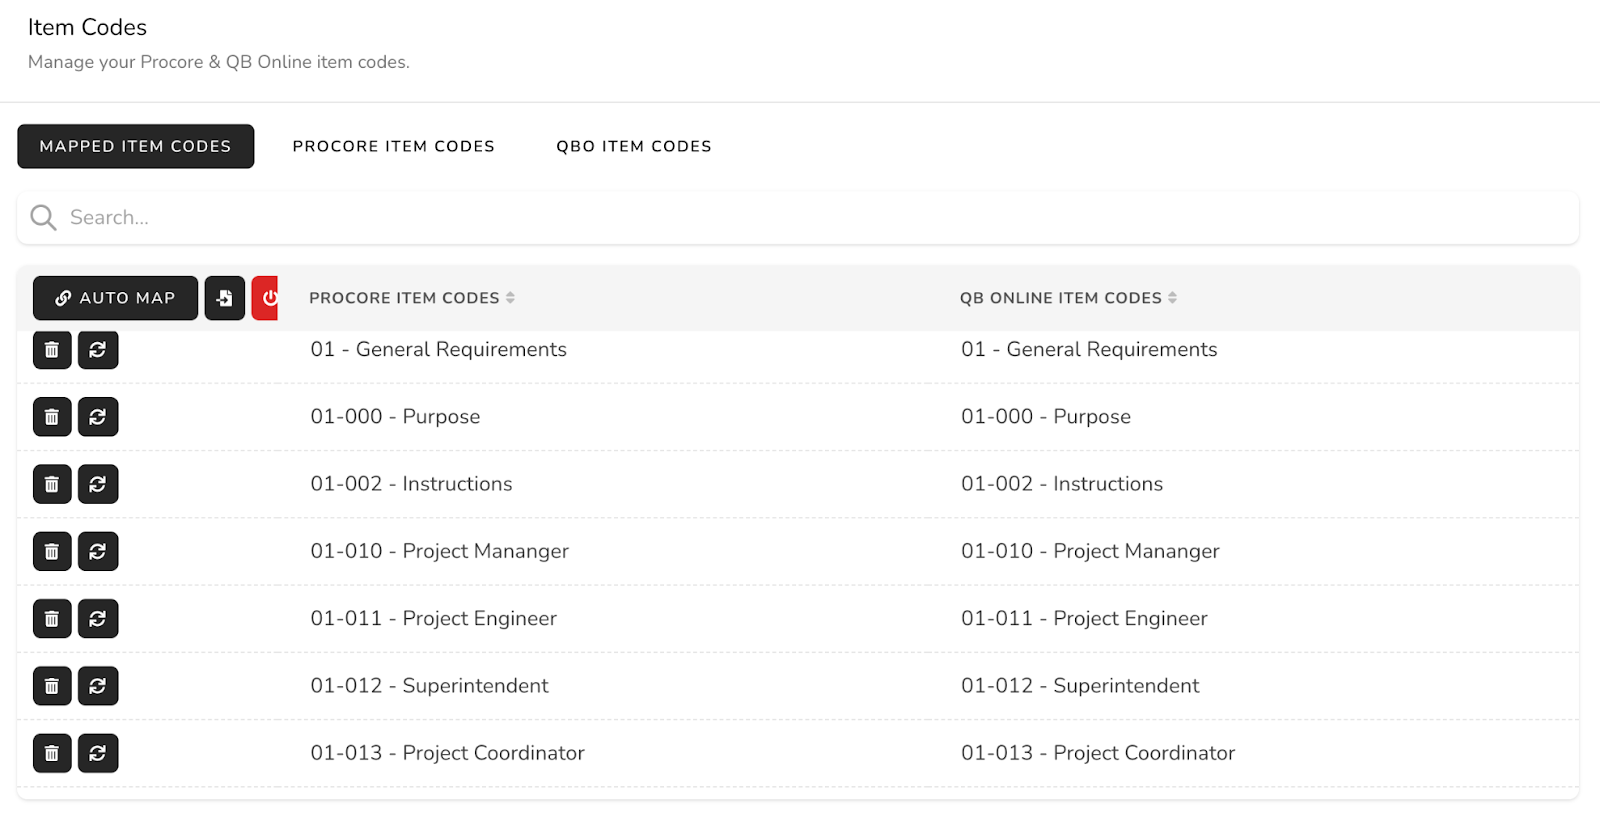
All that is required is to first load your Procore cost codes in the "Procore Item Codes" section , and secondly allocate a default account that will be applied to each Product and Service for the product/service's linked expense and income account.
Smoothlink can only apply one account for income and one for expenses when pushing across the product/service. This can be adjusted afterwards on the QuickBooks side once Smoothlink has pushed it through by going to the product / service list in QuickBooks and clicking 'edit' to adjust the income and expense accounts.
To allocate a default charge of account that will be associated to each Product/Service when pushing the cost codes from Procore to QuickBooks, click on the settings tab at the top.
Then on the left hand side select Defaults, and under QB Online Account codes section, populate the default chart of account you want applied to all product and services in the “bill code” row for the selected expense account for the service:
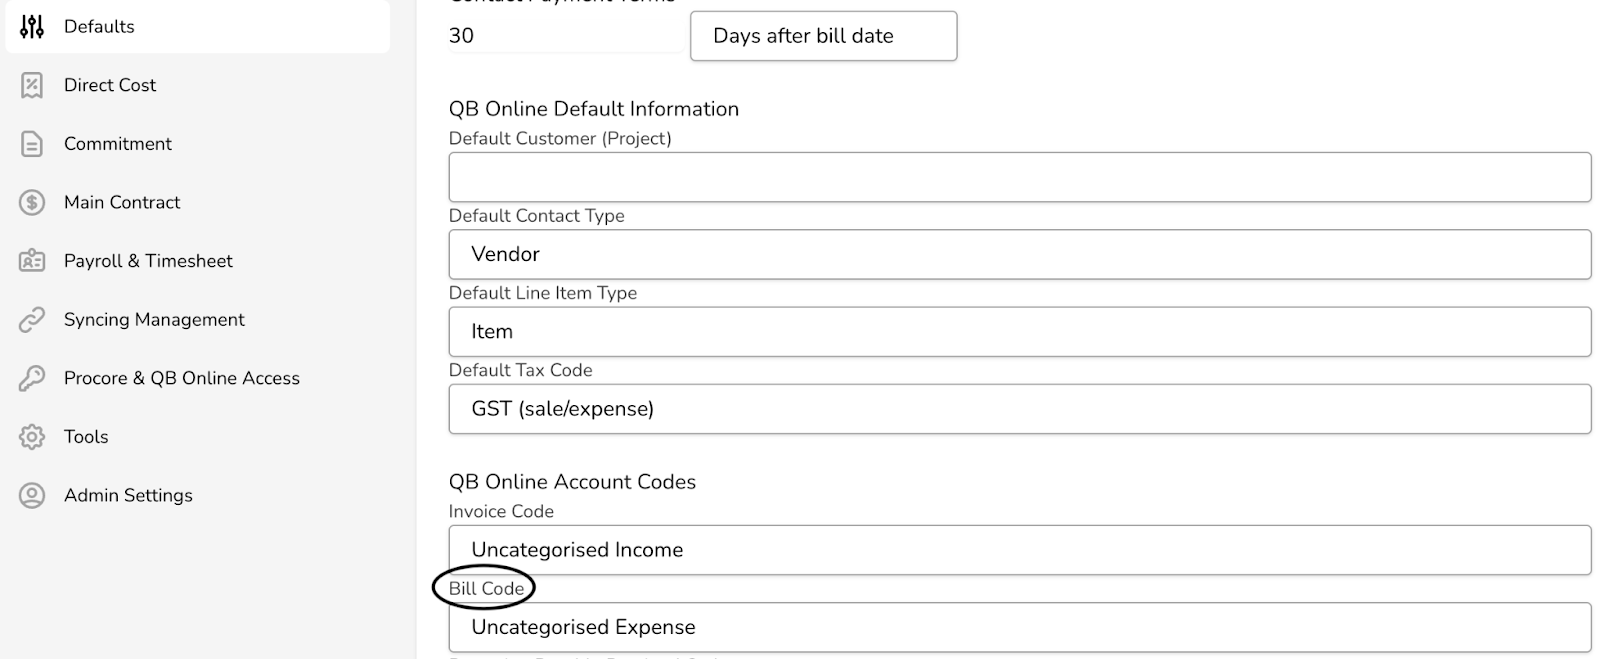
To select the income account for the service that will be pushed across, select the default 'invoice code'.
This will populate the fields shown here on the service once it pushes across to QuickBooks: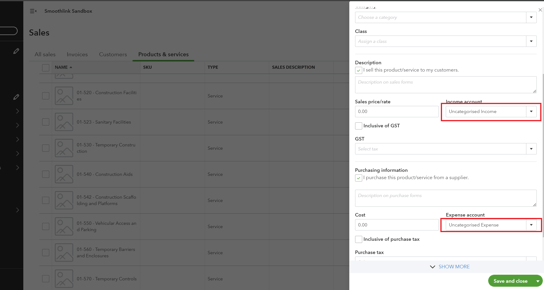
Finally for this option, ensure under defaults, and then default line item type, that 'Item' is selected.
This means that when syncing from Procore to QuickBooks, we will be using the items or product/services to send across the line items.

OPTION 3: Map Procore Cost Codes to QBO Chart of Accounts and Product and Services
This option allows ultimate flexibility. If you are wanting QBO to be as a simply as possible and will be performing job related reporting in Procore , but still require costs to be entered in Both Procore and QBO , then mapping to both Chart of Accounts and Product and Services is the answer.
How this will function is information that starts in Procore and pushes to QBO will push to your chart of account. Thus keeping detail in procore, and high level grouping in QBO.
Then for information that starts in QBO, you will utilise Product and Services when entering the bill/expense etc, as this will ensure smoothlink knows which cost codes to push to in Procore.
To do this follow steps in Option 1 and 2 above.
Then under the settings tab, then on the left hand side under defaults, ensure the row titled “default line item type”, that CATEGORY is selected.
OPTION 4: Map Procore Cost Codes to QBO Classes
QBO classes is a column available in all bill/expenses in QBO. The main reason why we have cost mapping to Classes is because QBO has a function where you can live sync credit cards. This function is called “banking”, where a customer uses there credit card at a store, that transaction will then automatically appear in the Banking feed. From there customers categorise that transaction in the QBO bank feed and the cost is created.
For whatever reason, QBO product and services are not available in the banking feed, thus in order to push credit card expenses from the bank feed to Procore we have allowed customers to map cost codes to classes, which is available in the banking feed.
If you have a lot of credit card payments and use the banking feed heavily, then mapping cost codes to classes could be beneficial and save time.
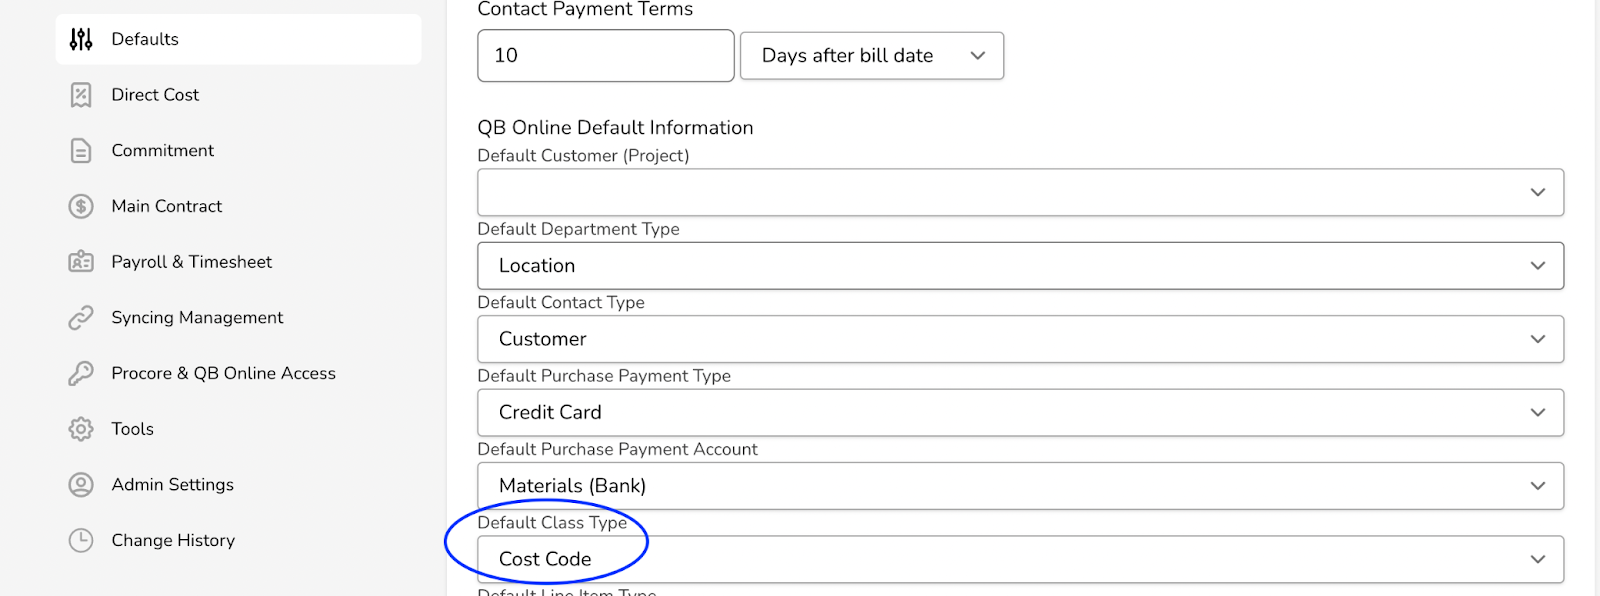
The first step to utilise this function is to go to the settings tab and then click defaults. Then under “default class type” select “Cost Code”.
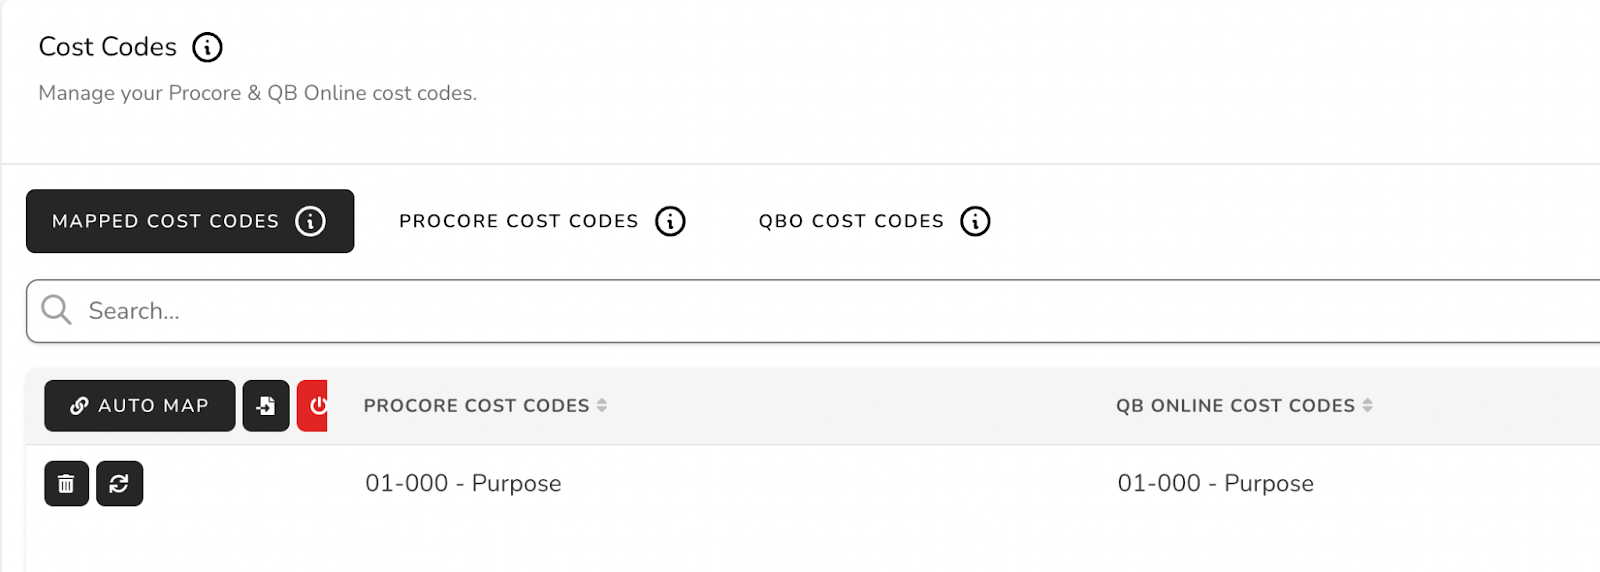
From here if you now click the mapping tab, you will see a new mapping table titled “cost codes”. This table will allow you to map your procore cost codes into the class field in QBO
Similar to the Chart of account or Product and service mapping, there will be three tabs. Tab 1 will show all mapped procore cost codes with QBO classes. Tab 2 will show all existing unmapped procore cost codes. And tab 3 will show all existing unmapped QBO Classes. In order to map Procore cost codes to QBO classes, you can either 1. Request a smoothlink employee to push all Procore cost codes to the class field and automap for you. 2. You can load the cost codes you want in the QBO class field, and then in the connector select auto map. Or 3. You can go to the procore tab in the class mapping table and click the sideways arrow to push across a procore cost code 1 by 1.
NOTE: the big con of this mapping is that you will not be able to map procore cost types with QBO (as we use class field to map cost types) thus you will only be able to use 1 cost type when pushing information from QBO to procore.
Mapping Tax Codes
If you are utilising Tax in QBO, then you will need to map tax codes for the integration to function. If you are not using Tax in QBO, then tax code mapping can be ignored.
To map tax codes you will need to create a tax code in Procore for each QBO Tax code that you want mapped. If QBO is broken out between sales and expense tax codes, you will need to make one in Procore for both sales and expense, for example a VAT 20% Sales and a VAT 20% Expense.
Reference this article on how to create tax codes in Procore.
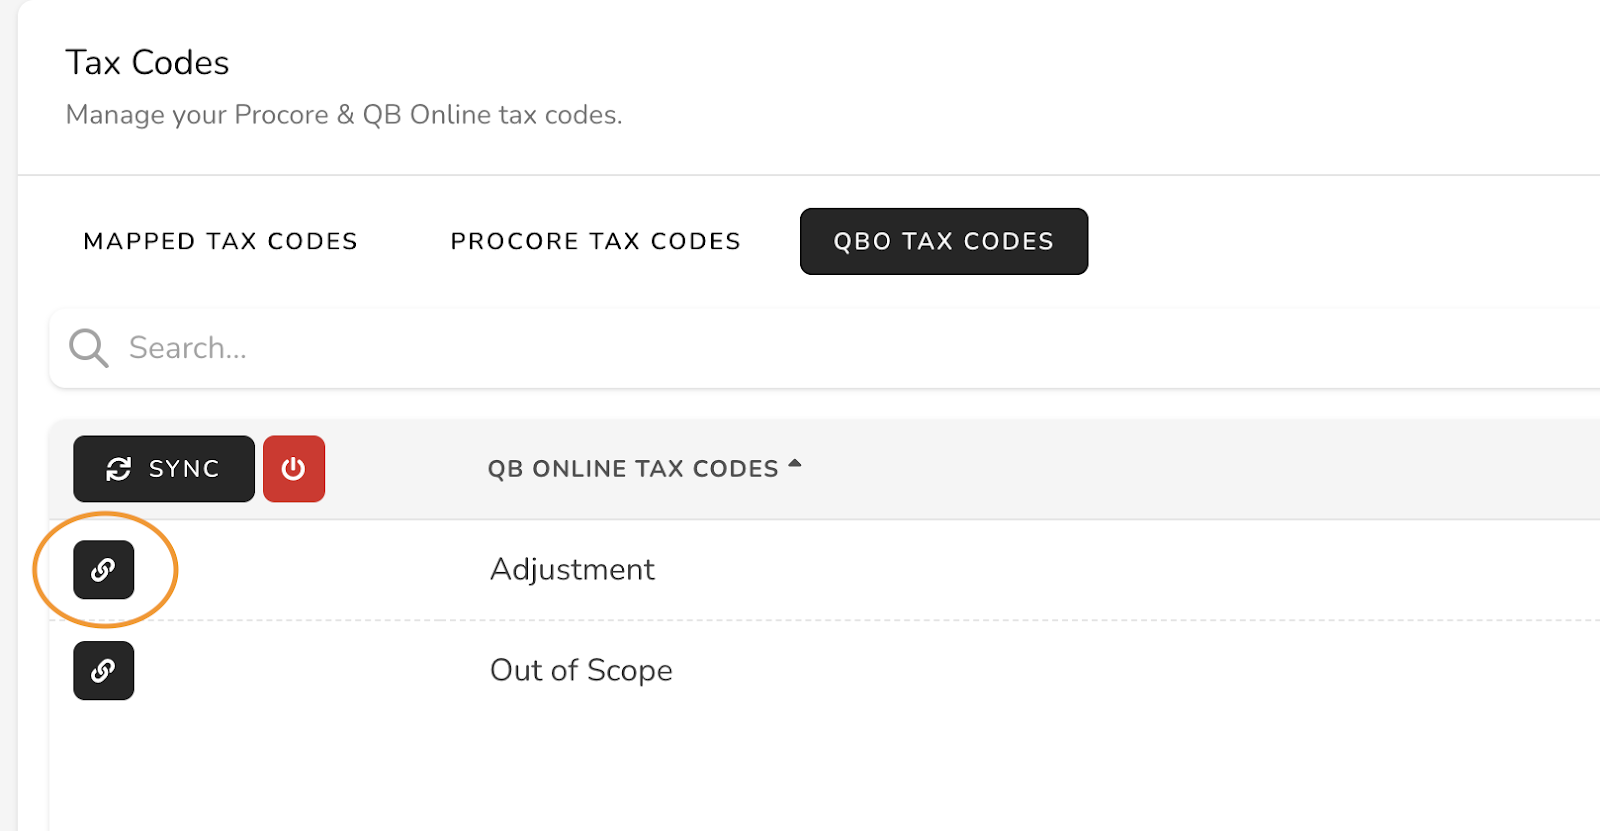
Once this is complete, within smoothlink mapping, scroll down to Tax and then click on Procore Tax codes and click sync. Now click on QBO tax codes and click sync.
Next to each QBO Tax code select the chain link icon, a popup will appear where you can choose the Procore tax code you would like to allocate to the QBO tax code. NOTE: once the tax code is mapped it will move from the QBO tax code tab and into the mapped tax code tab.
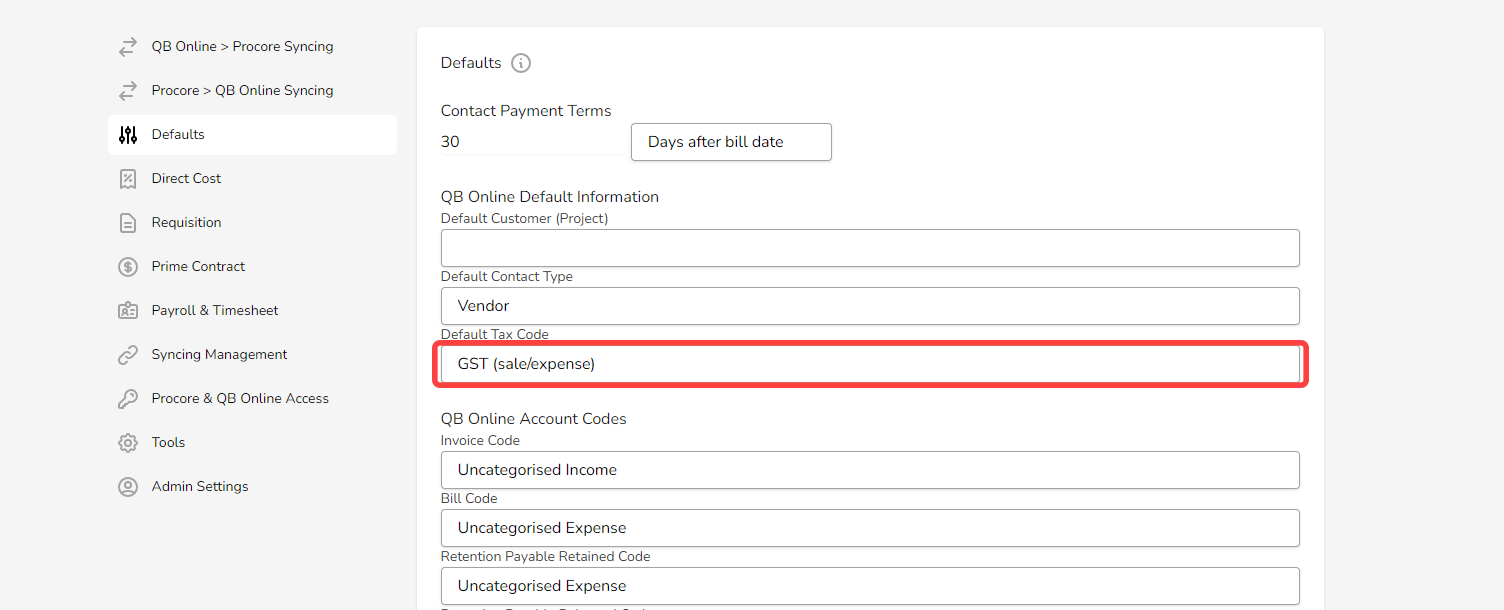
Finally, under the settings tab, if you click on defaults on the left hand side, under the default tax code row select a QBO tax code that should be applied if none is selected in procore.
Employee timesheet and labour cost Mapping
Smoothlink has developed two functionalities regarding Employee Timesheet.
Functionality 1: Timesheet push to QBO time activity
If you are using QBO time activity for payroll, smoothlink can push a procore timesheet into QBO time activity. We will sync across employee name, hours, days, and time type
Functionality 2: Labour cost creation in Procore
Smoothlink has developed a labour costing module. This will allow you to input an hourly rate for each employee, for each day, for each time type. When a timesheet/daily log timecard entry is approved, the hours inputted in procore will be multiplied by the rates imputed in smoothlink for the employee and a procore payroll direct cost will instantly be created. This will ensure you will get real time labour costing in procore. This will not affect QBO at all, as such can be utilised whether you are using QBO time activity or not.
This Video will go through Employee labour cost and timesheet mapping and setup.
Optional Mapping
If you are using Locations or Classes in QBO, chat to your Smoothlink Onboarding manager who will assist in mapping those fields between procore and QBO for you.
Required Settings before going Live:
Smoothlink Provides a settings tab to configure the QBO integration to be purpose fit for your business.
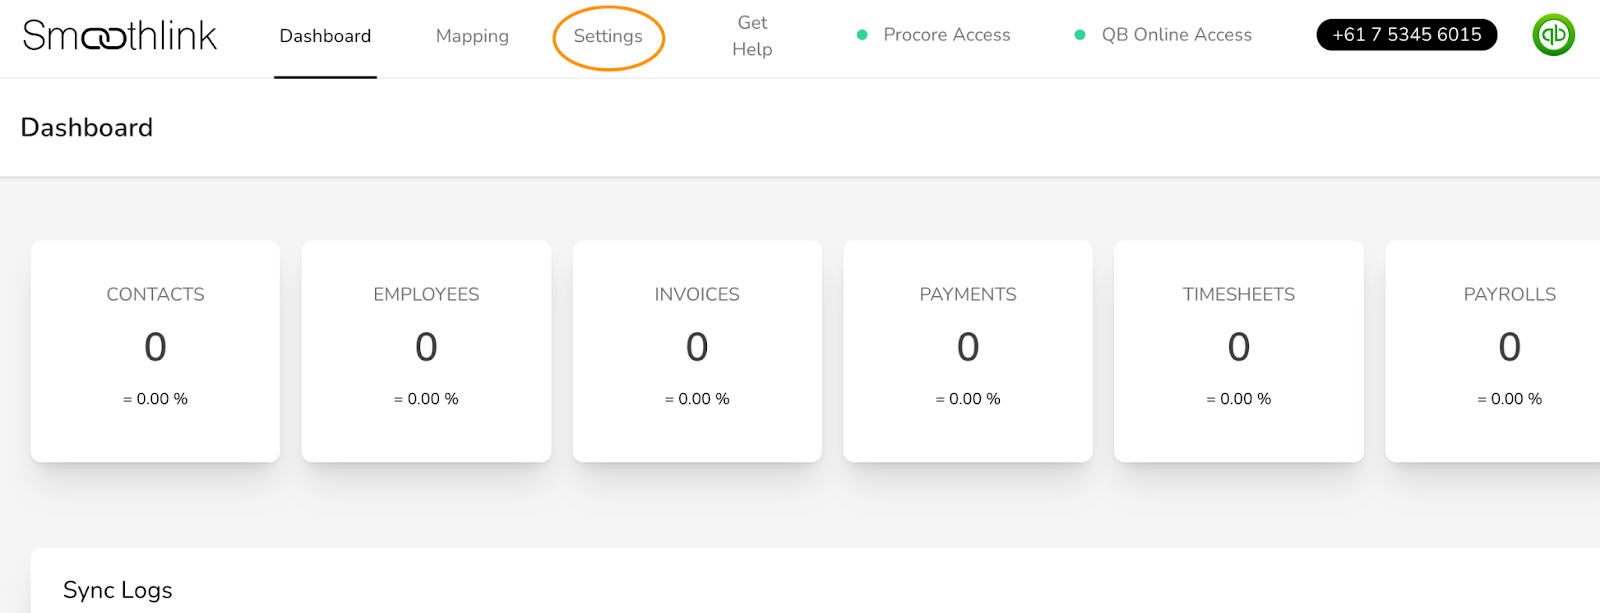
There will be optional settings for each part of the integration, that can be turned on or off. For a detailed explanation of each of the setting configurations, reference this DOC
Prior to going live with the integration, there are a couple of settings that must be configured. We will go through the required settings now.
Required Settings before go live:
Under the settings tab, click on “Defaults” on the far left hand side.
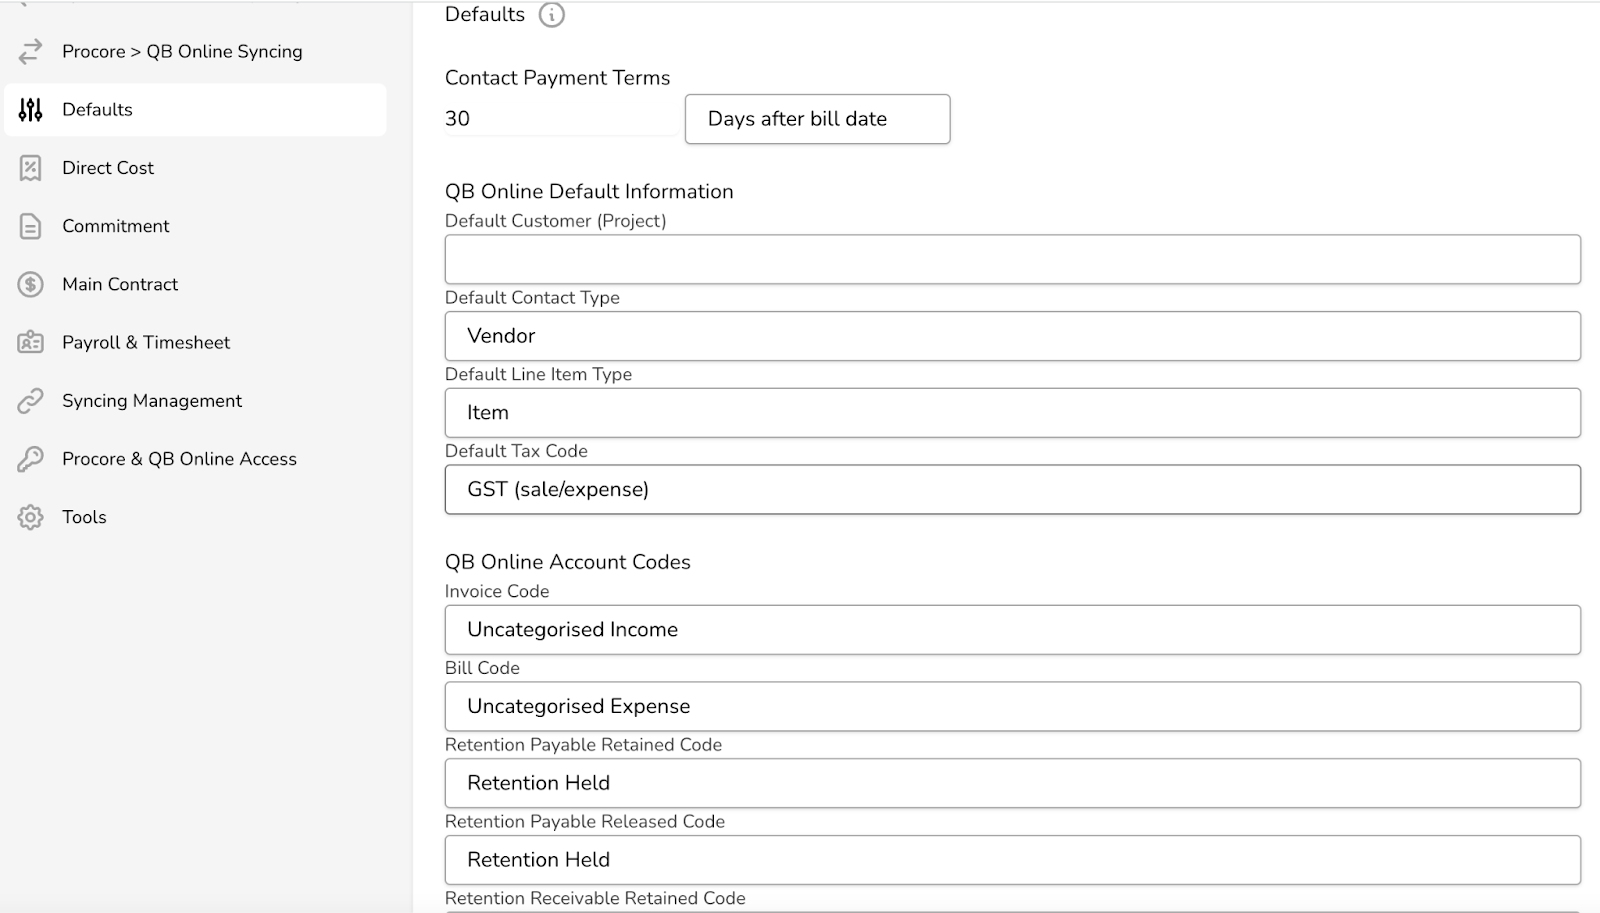
Default Line Item Row Setting:
- If you have mapped your Procore cost codes to your QBO chart of accounts (reference Cost code mapping above), then ensure category is selected here.
- If you are mapping solely to your QBO product and service (there is no chart of account mapping in smoothlink), then ensure item is selected here
Default tax code:
- If you are using tax in QBO, ensure a default tax code is selected
- If you are not using tax in QBO, ensure this row is empty.
QB Invoice Account Code:
- Input an account receivable/income code here. This is the code where your sales invoice in QBO will be coded to if there is a problem with the mapping
QB Bill Account Code:
- Input a accounts payable/expense code here. This is the code where your bills in QBO will be coded to if there is a problem with the mapping
QB Retention Payable Retained Code:
- The code selected here will be what is applied in QBO to all retention held in Procore Commitment Payment application. This must be selected if using retention on Subcontractors/Vendors in Procore, and if not the sync will fail.
QB Retention Payable Released Code
- The code selected here will be what is applied in QBO to all retention released in Procore Commitment Payment application. This must be selected if using retention on Subcontractors/ Vendors in Procore, and if not the sync will fail.
QB Retention Receivable Retained Code
- The code selected here will be what is applied to all retention held in Procore Prime Contract Payment application. This must be selected if retention is getting held against yourself/on your sales invoice in Procore, and if not the sync will fail.
QB Retention Receivable Released Code
- The code selected here will be what is applied to all retention released in Procore Prime Contract Payment application. This must be selected if retention is getting held against yourself/on your sales invoice in Procore, and if not the sync will fail.
Procore Bill Code
- The code selected here will be what is applied to all Direct Cost created in Procore from a QBO Bill if there is a mapping failure. Thus if the code selected in QBO bill is not mapped in smoothlink mapping section, instead of the sync failing, smoothlink will automatically apply the selected code instead in the Procore Direct Cost
Procore Payroll Code
- The code selected here will be what is applied to all Direct Cost created in Procore from a QBO Payrun/timesheets if there is a mapping failure. If there is no code selected in the QBO Payrun/timesheet or if the code selected is not mapped in smoothlink mapping section, instead of the sync failing, smoothlink will automatically apply the selected code instead in the Procore Direct Cost
Under the Direct Cost setting
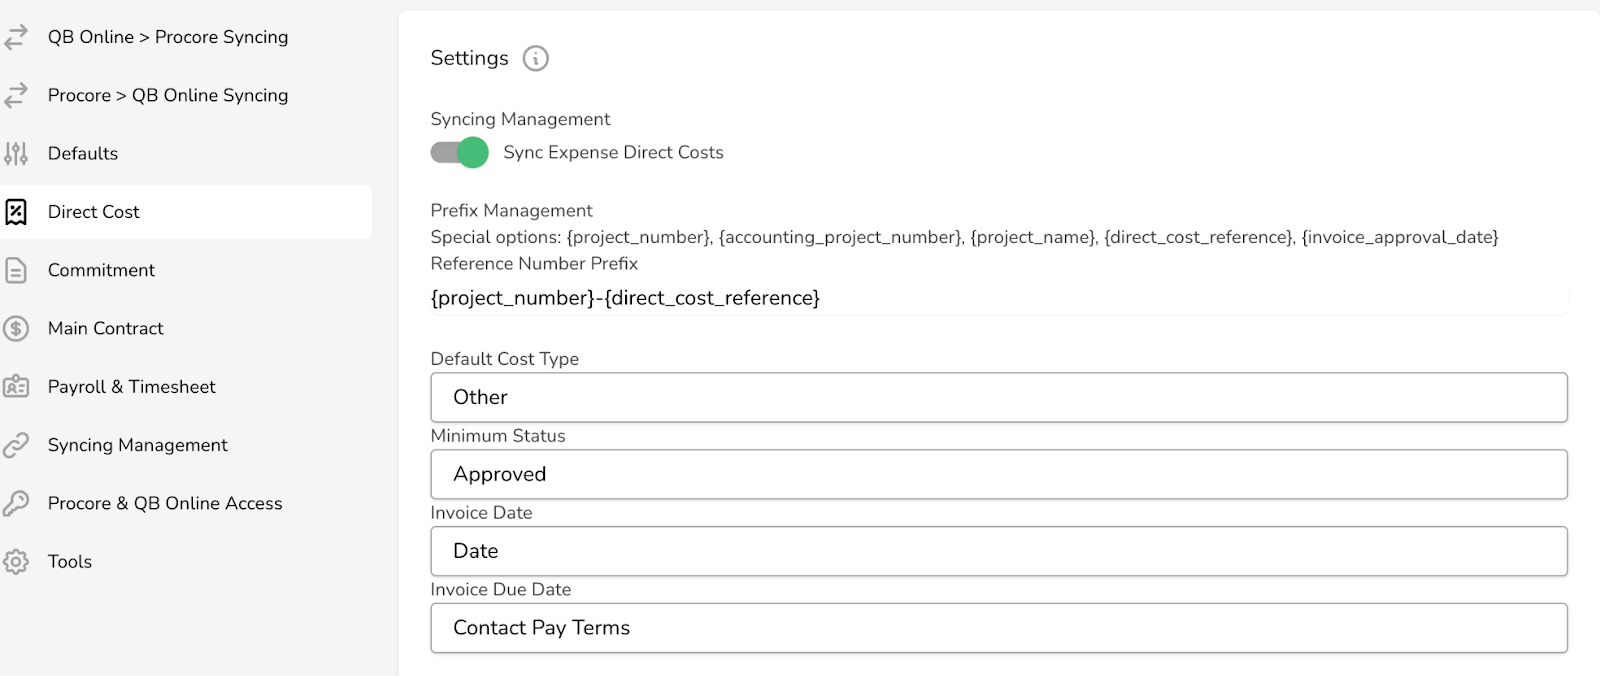
Sync Expense Direct Costs
- If you want to be able to enter direct cost in procore and for smoothlink to sync that over to a QBO bill, then toggle this setting on
Default Cost Type
- This row must be selected with a procore cost type. If you are not using the optional classes mapping, then a QBO bill will not push to Procore Direct costs unless there is a cost type selected here. NOTE: what is selected here is the cost type that will be applied to all direct cost syncing from QBO.
The above are the settings required for the integration to be turned on Live. If you would like to go through all the settings before turning the integration on live, ask your smoothlink Onboarding manager to go through each setting with you.
YOU ARE NOW READY TO TURN THE SMOOTHLINK PROCORE <> QBO INTEGRATION ON LIVE.